Documentation
Everything you need to integrate AnRouter. Fully compatible with OpenAI, Anthropic, and Gemini SDKs — get your first response in under 2 minutes.
Quick Start
AnRouter is fully compatible with the OpenAI API specification. If you've already used OpenAI, you only need to change two things: your base URL and your API key. Everything else stays the same.
BASE URL: https://api.anrouter.com/v1
AUTH: Authorization: Bearer YOUR_API_KEY
from openai import OpenAI

client = OpenAI(
    api_key="YOUR_ANROUTER_API_KEY",
    base_url="https://api.anrouter.com/v1"
)

response = client.chat.completions.create(
    model="deepseek-v4-flash",
    messages=[
        {"role": "system", "content": "You are a helpful assistant."},
        {"role": "user",   "content": "Write a binary search in Python."}
    ]
)

print(response.choices[0].message.content)
import OpenAI from 'openai';
const client = new OpenAI({
apiKey: 'YOUR_ANROUTER_API_KEY',
baseURL: 'https://api.anrouter.com/v1',
});
const response = await client.chat.completions.create({
model: 'deepseek-v4-flash',
messages: [
{ role: 'system', content: 'You are a helpful assistant.' },
{ role: 'user', content: 'Write a binary search in TypeScript.' },
],
});
console.log(response.choices[0].message.content);package main
import (
"context"
"fmt"
"github.com/openai/openai-go"
"github.com/openai/openai-go/option"
)
func main() {
client := openai.NewClient(
option.WithAPIKey("YOUR_ANROUTER_API_KEY"),
option.WithBaseURL("https://api.anrouter.com/v1"),
)
resp, _ := client.Chat.Completions.New(context.Background(),
openai.ChatCompletionNewParams{
Model: openai.F("deepseek-v4-flash"),
Messages: openai.F([]openai.ChatCompletionMessageParamUnion{
openai.SystemMessage("You are a helpful assistant."),
openai.UserMessage("Write a binary search in Go."),
}),
},
)
fmt.Println(resp.Choices[0].Message.Content)
}curl https://api.anrouter.com/v1/chat/completions \
-H "Authorization: Bearer $ANROUTER_API_KEY" \
-H "Content-Type: application/json" \
-d '{
"model": "deepseek-v4-flash",
"messages": [
{"role": "system", "content": "You are a helpful assistant."},
{"role": "user", "content": "Write a binary search in Python."}
]
}'Authentication
All API requests require authentication using an API key. Include your key in the Authorization header as a Bearer token.
Authorization: Bearer YOUR_ANROUTER_API_KEYSecurity Note: Keep your keys secure — never expose them in client-side code, public repositories, or frontend applications. Your API key carries full account privileges. If a key is compromised, rotate it immediately from the dashboard.
Available Models
Use the model IDs below exactly as shown in your API requests. Call GET /v1/models to fetch available models programmatically.
| Model ID | Context Window | Provider |
|---|---|---|
| deepseek-v4-flash | 1,000,000 tokens (1M) | DeepSeek |
| mimo-v2.5-pro | 1,000,000 tokens (1M) | Xiaomi AI |
| kimi-k2.6 | 256,000 tokens (256K) | Moonshot AI |
| glm-5.2 | 1,000,000 tokens (1M) | Z.ai |
| qwen-3.6-27b | 256,000 tokens (256K) | Qwen |
| minimax-m2.7 | 200,000 tokens (200K) | MiniMax |
Rate Limits & Quotas
Rate limits are enforced based on Requests Per Minute (RPM) and Tokens Per Minute (TPM). Default limits vary by tier:
- Standard: 60 RPM / 100,000 TPM
- Pro: 600 RPM / 2,000,000 TPM (Priority queue access)
- Enterprise: Customizable limits based on dedicated throughput contracts.
When limits are reached, the API returns a 429 Rate Limit Exceeded error response. We recommend implementing exponential backoff retry logic.
Chat Completions API
POST /v1/chat/completions
Creates a model response for the given conversation. Fully compatible with OpenAI Chat Completions.
Key Request Properties
messages array (required)
An array of message objects. Message schema: {"role": "user"|"system"|"assistant", "content": "..."}.
model string (required)
The ID of the target model (e.g. deepseek-v4-flash).
stream boolean (optional, default: false)
If true, streams partial delta response chunks using Server-Sent Events (SSE).
temperature number (optional, default: 1.0)
Controls output randomness (0.0 to 2.0). Lower is more deterministic.
Example JSON Response
{
  "id": "chatcmpl-anr98213",
  "object": "chat.completion",
  "created": 1751000000,
  "model": "deepseek-v4-flash",
  "choices": [
    {
      "index": 0,
      "message": {
        "role": "assistant",
        "content": "A binary search splits the list in half..."
      },
      "finish_reason": "stop"
    }
  ],
  "usage": {
    "prompt_tokens": 18,
    "completion_tokens": 42,
    "total_tokens": 60
  }
}
Responses API
POST /v1/responses
AnRouter fully supports the newer OpenAI stateful Responses inference interface (introduced in OpenAI SDKs v1.66+ / v4.80+). Make direct calls using client.responses.create(...).
# Python responses snippet
response = client.responses.create(
    model="deepseek-v4-flash",
    input="Explain transformers in one sentence."
)
print(response.output_text)
Anthropic Messages API
POST /v1/messages
Integrate AnRouter models seamlessly into Anthropic's official SDKs by pointing the SDK's baseURL to https://api.anrouter.com (without the /v1 suffix).
import anthropic

client = anthropic.Anthropic(
    api_key="YOUR_ANROUTER_API_KEY",
    base_url="https://api.anrouter.com"
)

message = client.messages.create(
    model="deepseek-v4-flash",
    max_tokens=1024,
    messages=[{"role": "user", "content": "Explain CAP Theorem."}]
)
print(message.content[0].text)
List Models API
GET /v1/models
Retrieve the list of active models served by AnRouter.
curl https://api.anrouter.com/v1/models \
  -H "Authorization: Bearer $ANROUTER_API_KEY"
Error Codes
AnRouter uses standard HTTP response codes to indicate request success or failure:
| Code | Type | Description |
|---|---|---|
| 400 | invalid_request_error | Malformed body or unsupported parameters. |
| 401 | authentication_error | Invalid or missing API key. |
| 429 | rate_limit_error | RPM or TPM quota exceeded. |
| 500 | api_error | Internal server error. Retry with backoff. |
Streaming
Stream outputs in real-time. Set "stream": true in your completions payload.
# Python streaming
stream = client.chat.completions.create(
    model="deepseek-v4-flash",
    messages=[{"role": "user", "content": "Explain AI."}],
    stream=True
)
for chunk in stream:
    content = chunk.choices[0].delta.content
    if content:
        print(content, end="", flush=True)
Function Calling
Pass a list of functions the model can choose to call in response to user prompts.
tools = [{
    "type": "function",
    "function": {
        "name": "get_weather",
        "description": "Get current weather in city.",
        "parameters": {
            "type": "object",
            "properties": {"city": {"type": "string"}},
            "required": ["city"]
        }
    }
}]
response = client.chat.completions.create(
    model="deepseek-v4-flash",
    messages=[{"role": "user", "content": "What's the weather in Tokyo?"}],
    tools=tools
)
JSON Mode
Force the model output to be structured as a valid JSON object by setting "response_format": {"type": "json_object"}.
response = client.chat.completions.create(
    model="deepseek-v4-flash",
    messages=[
        {"role": "system", "content": "Respond strictly in JSON."},
        {"role": "user", "content": "Get Alice's details: age 30, city Berlin."}
    ],
    response_format={"type": "json_object"}
)
Codex
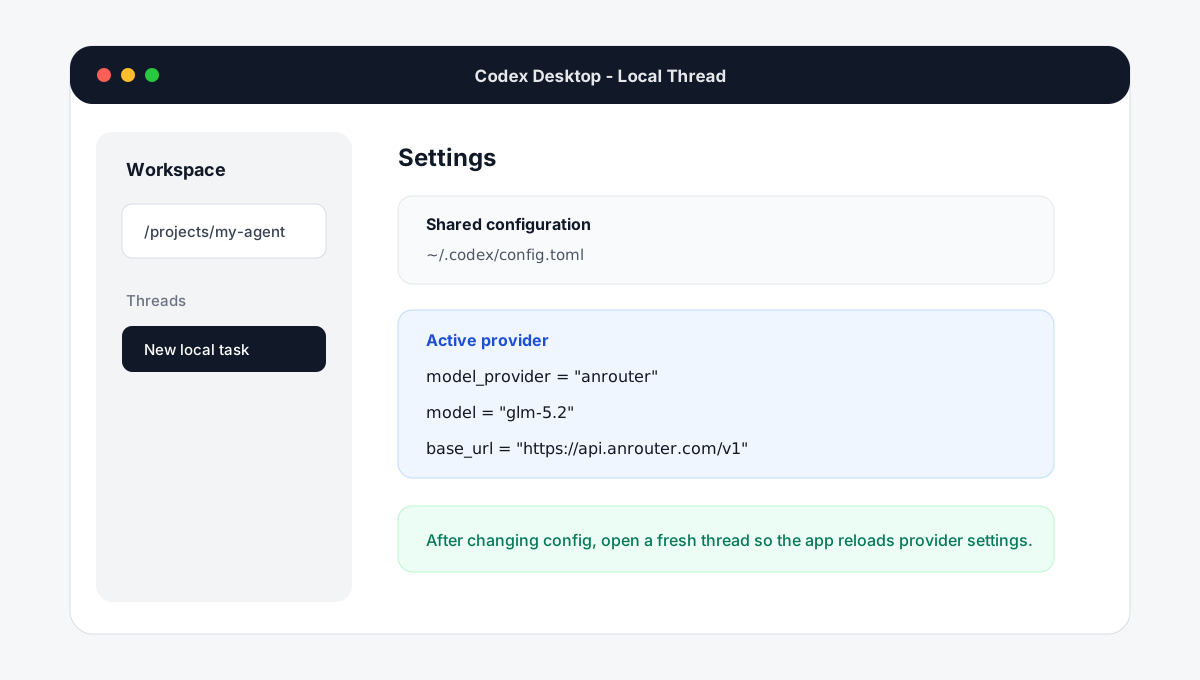
This guide covers both Codex CLI and the Codex desktop app with AnRouter models. Codex reads durable settings from ~/.codex/config.toml. The CLI, app, and IDE extension share the same configuration layers, so a provider profile is the cleanest way to use third-party OpenAI-compatible models.
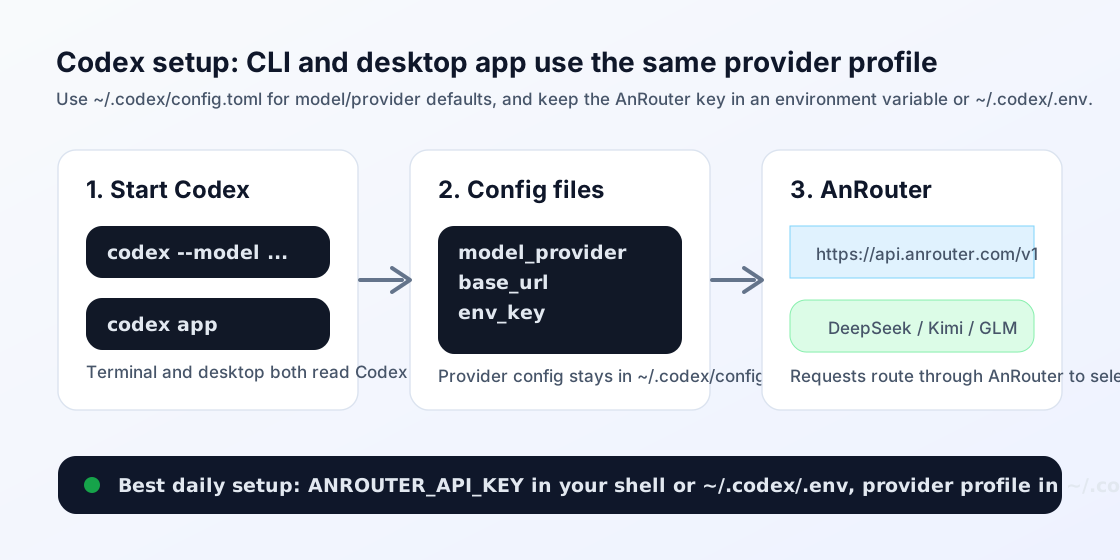
~/.codex/config.toml, supports custom model_providers, lets CLI flags override the configured model for one run, and launches the desktop app with codex app. For AnRouter, configure a custom OpenAI-compatible provider.Part A - Install and Check Codex CLI
- Install Codex. Use the official standalone installer when available:
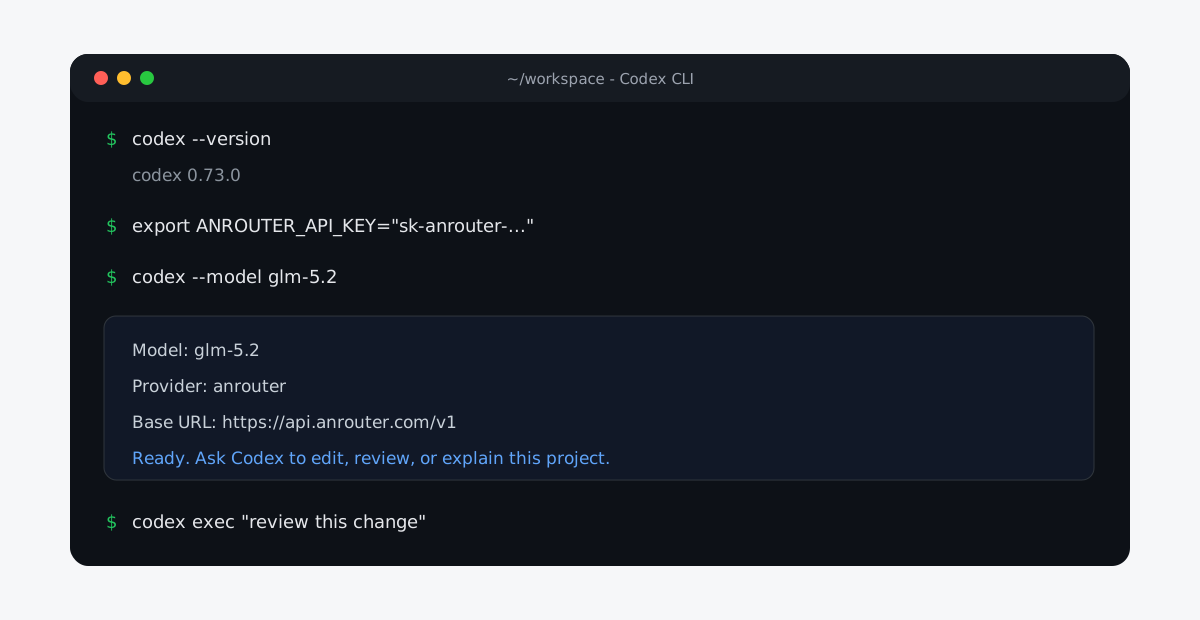
curl -fsSL https://chatgpt.com/codex/install.sh | sh. On Windows PowerShell, useirm https://chatgpt.com/codex/install.ps1 | iex. If your environment already distributes Codex through npm or Homebrew, keep that package manager path consistent with your team. - Confirm the binary. Run
codex --version, then start an empty session withcodex. - Authenticate if you use OpenAI directly. Run
codex loginfor ChatGPT or OpenAI API-key workflows. For AnRouter custom provider usage, keep the AnRouter key in an environment variable and let the provider profile read it.
Part B - Quick One-Terminal Test
Use this only to confirm that the endpoint and model name work. It applies to the terminal you are currently using.
macOS / Linux
export OPENAI_API_KEY="your_anrouter_api_key"
export OPENAI_BASE_URL="https://api.anrouter.com/v1"

codex --model deepseek-v4-flash
Windows PowerShell
$env:OPENAI_API_KEY = "your_anrouter_api_key"
$env:OPENAI_BASE_URL = "https://api.anrouter.com/v1"

codex --model deepseek-v4-flash
Part C - Recommended Persistent Provider
Create or edit ~/.codex/config.toml. This keeps AnRouter separate from your normal OpenAI login and makes model switching predictable.
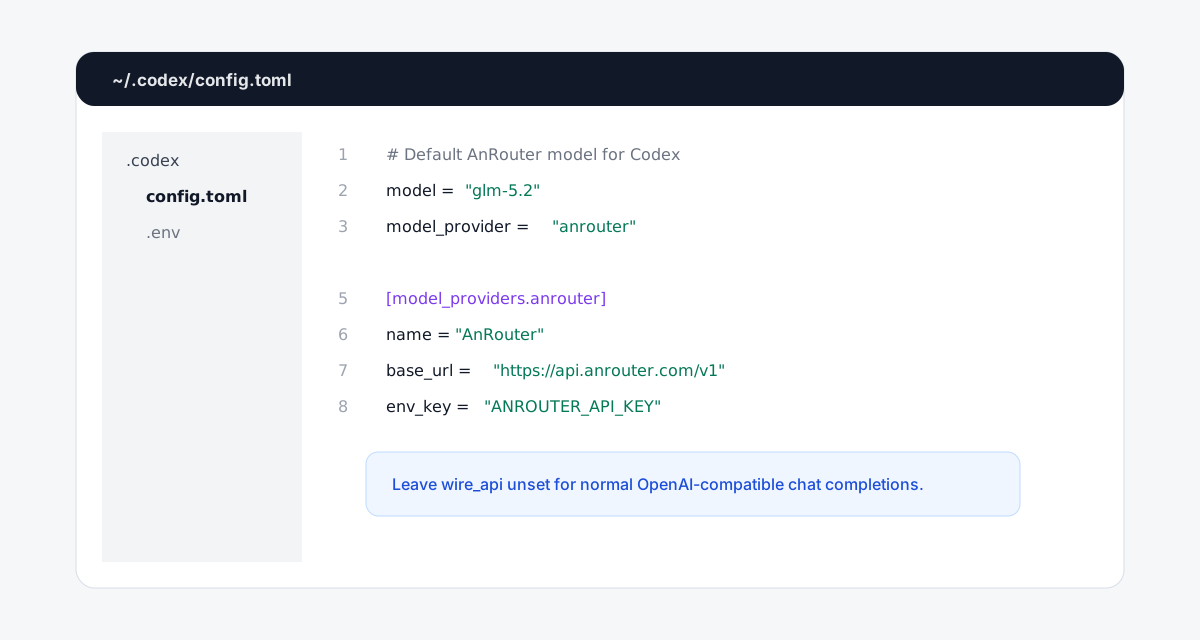
~/.codex/config.toml.# ~/.codex/config.toml
model = "glm-5.2"
model_provider = "anrouter"
[model_providers.anrouter]
name = "AnRouter"
base_url = "https://api.anrouter.com/v1"
env_key = "ANROUTER_API_KEY"Then provide the key. For terminal-only usage, your shell profile is enough. For the desktop app or IDE extension, put the same variable in ~/.codex/.env because desktop apps may not inherit shell exports.
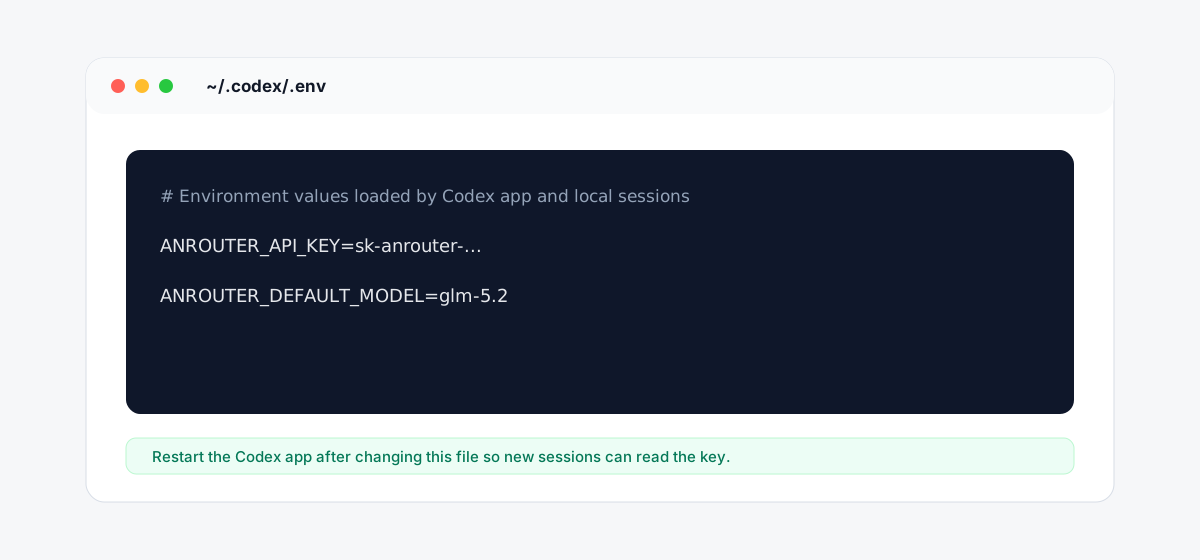
~/.codex/.env when the desktop app cannot see shell-only environment variables.# Terminal session
export ANROUTER_API_KEY="your_anrouter_api_key"
# Optional file for Codex app / IDE extension
# ~/.codex/.env
ANROUTER_API_KEY=your_anrouter_api_keyPart D - Use the Codex Desktop App
- Launch it with
codex appon macOS or Windows, or open the installed Codex app directly. - Open Settings with
Cmd+,on macOS and use the configuration shortcut to inspectconfig.toml. - Start a local thread in the project folder you want Codex to edit. The app uses the same provider profile as the CLI, plus values from
~/.codex/.env. - Open the app terminal and run
printenv ANROUTER_API_KEYor the Windows equivalent if you need to confirm the key is visible. - Use the model selector or start a new thread after changing
config.toml. A fresh session avoids stale provider state.
Model and Command Reference
| Need | Command / Setting | Notes |
|---|---|---|
| Fast coding | deepseek-v4-flash | Good default for quick edits and low-cost sessions. |
| Complex refactor | glm-5.2 | Strongest choice for coding, code reasoning, and multi-file refactors. |
| Large context | kimi-k2.6 | Useful for repository-wide reading and long files. |
| Multimodal input | qwen-3.6-27b | Use when the client supports text, image, or video inputs. |
| One-off override | codex --model glm-5.2 | Overrides the configured model for that run only. |
| Non-interactive task | codex exec "review this change" | Useful for scripts and repeatable checks. |
~/.codex/.env and restart the app. If the model is missing, confirm the model ID exists in AnRouter and restart the Codex session after changing config.toml. If authentication fails, confirm ANROUTER_API_KEY is set and the base URL is exactly https://api.anrouter.com/v1. Only add wire_api = "responses" when your provider explicitly supports the Responses wire API; leave it unset for normal OpenAI-compatible chat-completions routing.Claude Code CLI and Desktop Tutorial
Claude Code can use an LLM gateway from the CLI, but the desktop app has a different rule. Official Claude Code gateway docs say the CLI reads ANTHROPIC_BASE_URL plus a gateway credential, while the desktop app reads gateway routing from administrator-distributed configuration, not normal local shell variables.
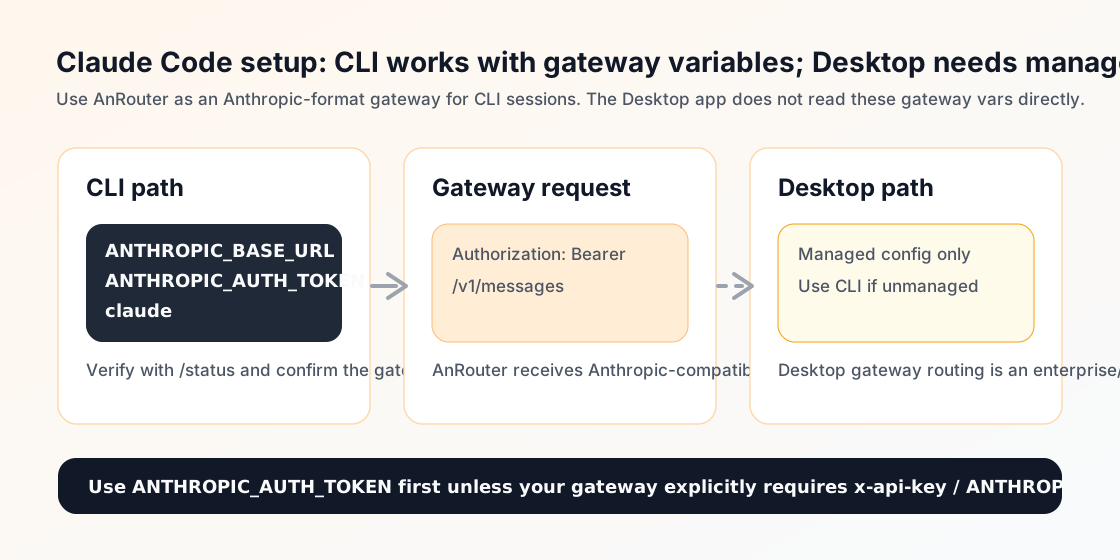
ANTHROPIC_BASE_URL=https://api.anrouter.com without /v1. Claude Code sends Anthropic-format requests to $ANTHROPIC_BASE_URL/v1/messages. The OpenAI-compatible https://api.anrouter.com/v1 URL is for Codex, OpenCode, Aider, Cursor, and similar OpenAI-compatible tools.Part A - CLI Setup
- Install Claude Code CLI with npm:
npm install -g @anthropic-ai/claude-code. - Open a project folder in your terminal and run
claudeonce to confirm the command starts. - Decide which credential header your AnRouter Claude-compatible gateway expects. Use
ANTHROPIC_AUTH_TOKENfor a Bearer token / Authorization header. UseANTHROPIC_API_KEYonly when the gateway expectsx-api-key.
Part B - Temporary CLI Test
macOS / Linux
export ANTHROPIC_BASE_URL="https://api.anrouter.com"
export ANTHROPIC_AUTH_TOKEN="your_anrouter_api_key"
export ANTHROPIC_MODEL="glm-5.2"

claude
Windows PowerShell
$env:ANTHROPIC_BASE_URL = "https://api.anrouter.com"
$env:ANTHROPIC_AUTH_TOKEN = "your_anrouter_api_key"
$env:ANTHROPIC_MODEL = "glm-5.2"

claude
Part C - Persist for CLI Sessions
Put the variables in Claude Code's settings file when you want them to apply beyond one terminal. Use the user-level file for your own machine; use the project local file only for a single repo and keep it out of git.
// ~/.claude/settings.json
{
  "env": {
    "ANTHROPIC_BASE_URL": "https://api.anrouter.com",
    "ANTHROPIC_AUTH_TOKEN": "your_anrouter_api_key",
    "ANTHROPIC_MODEL": "glm-5.2",
    "CLAUDE_CODE_ENABLE_GATEWAY_MODEL_DISCOVERY": "1"
  }
}
If your gateway uses x-api-key, replace ANTHROPIC_AUTH_TOKEN with ANTHROPIC_API_KEY. Do not set both unless your gateway team tells you to.
Part D - Verify Before Real Work
- Run
claudefrom the same terminal where the variables are set. - Inside Claude Code, run
/status. The Status tab should show an Anthropic base URL and an auth source such asANTHROPIC_AUTH_TOKEN. - Send a short message. If you get
401, swap credential type: Bearer token meansANTHROPIC_AUTH_TOKEN; x-api-key meansANTHROPIC_API_KEY. - Use
/modelto switch models. If gateway discovery is enabled and supported, additional gateway models appear in the picker.
Part E - Claude Desktop / App Setup
| Desktop need | Correct setup |
|---|---|
| Install app | Download from claude.ai/download, sign in, then open the Code tab. |
| Normal Anthropic usage | Pick a project folder, model, and permission mode in the Code tab. Desktop has panes for chat, diff, preview, terminal, and file editing. |
| AnRouter gateway usage | Desktop gateway routing must be distributed by an organization/admin managed configuration. Local ANTHROPIC_BASE_URL and settings.json are not enough for Desktop gateway routing. |
| No managed desktop config | Use the Claude Code CLI or VS Code extension for AnRouter gateway sessions. The desktop app can still be used for regular Claude account workflows. |
ANTHROPIC_BASE_URL variables. If Desktop says Gateway was unreachable, test the same base URL from the terminal first.OpenCode CLI and Desktop App Tutorial
OpenCode is a model-agnostic coding agent available as a terminal UI, desktop app, and IDE extension. Its official config supports custom OpenAI-compatible providers through @ai-sdk/openai-compatible, which makes AnRouter a natural fit.
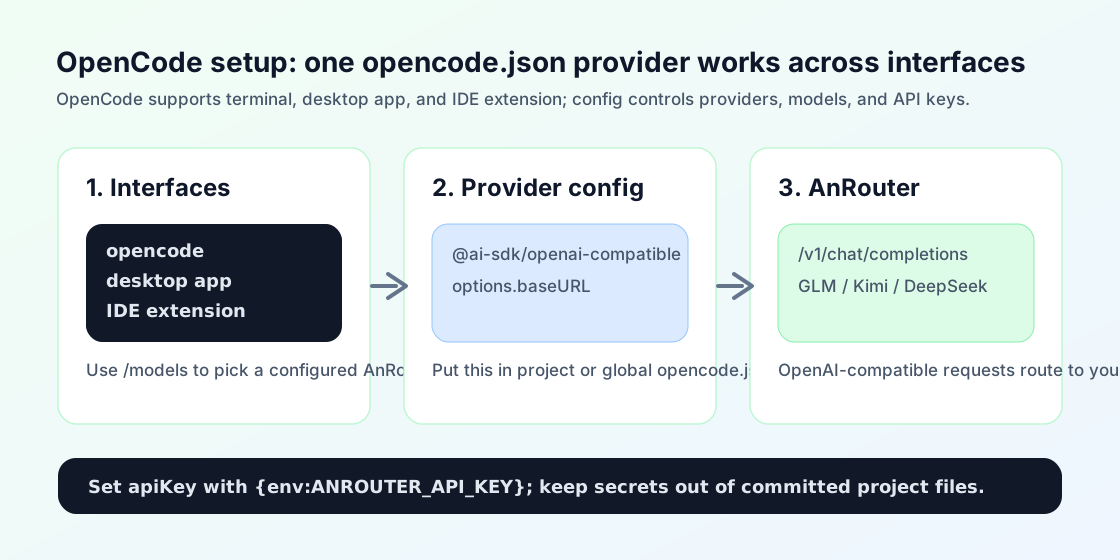
~/.config/opencode/opencode.json and project config at opencode.json. The same settings apply across TUI, CLI run mode, desktop app, and GitHub Action.Part A - Install OpenCode CLI
| Platform | Command |
|---|---|
| Install script | curl -fsSL https://opencode.ai/install | bash |
| npm | npm install -g opencode-ai |
| Homebrew | brew install anomalyco/tap/opencode |
| Windows | choco install opencode |
Run opencode --version and then opencode in a project folder to confirm the terminal UI starts.
Part B - Quick Environment Test
This quick mode uses OpenAI-compatible environment variables. Use the persistent provider config below for daily use.
macOS / Linux
export OPENAI_BASE_URL="https://api.anrouter.com/v1"
export OPENAI_API_KEY="your_anrouter_api_key"

opencode
Windows PowerShell
$env:OPENAI_BASE_URL = "https://api.anrouter.com/v1"
$env:OPENAI_API_KEY = "your_anrouter_api_key"

opencode
Part C - Recommended opencode.json
Create opencode.json in your project root, or use ~/.config/opencode/opencode.json for a global setup. Keep secrets in environment variables, not in committed config.
{
  "$schema": "https://opencode.ai/config.json",
  "model": "anrouter/glm-5.2",
  "small_model": "anrouter/deepseek-v4-flash",
  "provider": {
    "anrouter": {
      "npm": "@ai-sdk/openai-compatible",
      "name": "AnRouter",
      "options": {
        "baseURL": "https://api.anrouter.com/v1",
        "apiKey": "{env:ANROUTER_API_KEY}"
      },
      "models": {
        "glm-5.2": { "name": "GLM 5.2", "limit": { "context": 1048576, "output": 128000 } },
        "qwen-3.6-27b": { "name": "Qwen-3.6-27B", "limit": { "context": 262144, "output": 262144 } },
        "kimi-k2.6": { "name": "Kimi K2.6", "limit": { "context": 262144, "output": 262144 } },
        "mimo-v2.5-pro": { "name": "MiMo V2.5 Pro", "limit": { "context": 1048576, "output": 131072 } },
        "deepseek-v4-flash": { "name": "DeepSeek V4 Flash", "limit": { "context": 1048576, "output": 16384 } },
        "minimax-m2.7": { "name": "MiniMax M2.7", "limit": { "context": 204800, "output": 196608 } }
      }
    }
  }
}
Then export the key and start OpenCode:
export ANROUTER_API_KEY="your_anrouter_api_key"
opencode
Part D - Select and Verify Models
- Inside the OpenCode TUI, run
/models. - Choose
anrouter/glm-5.2,anrouter/qwen-3.6-27b,anrouter/kimi-k2.6, oranrouter/deepseek-v4-flash. - Ask a small code question first. If it fails, run
opencode auth listand check whether a conflicting provider credential is active. - If a custom provider does not appear, confirm that
npmis@ai-sdk/openai-compatibleandoptions.baseURLis exactlyhttps://api.anrouter.com/v1.
Part E - Desktop App and IDE Extension
OpenCode's docs describe the product as available in terminal, desktop app, and IDE extension. Because config is shared across interfaces, the safest workflow is to make your provider work in the CLI first, then open the same project in the desktop app.
- Install or open the OpenCode desktop app from opencode.ai or your team's distribution channel.
- Open the project folder that contains
opencode.json. - Ensure
ANROUTER_API_KEYis available to the app. If a desktop-launched app does not inherit your shell, move provider config to global~/.config/opencode/opencode.jsonand set the key in your OS/user environment. - Use the app's model picker or the same
/modelsflow if exposed. Pick theanrouter/*model and send a short test prompt.
/v1/chat/completions, use @ai-sdk/openai-compatible. Only use @ai-sdk/openai if a specific model/provider requires the newer /v1/responses route. If the desktop app sees no key, test in the CLI first and then move the key to an environment source the app can read.Cursor Integration
Cursor is a popular AI-first code editor built on VS Code. It supports custom OpenAI-compatible model providers, letting you replace or augment the default Cursor models with AnRouter's full lineup of frontier Chinese AI models — DeepSeek, Kimi, GLM, MiMo, and MiniMax — at significantly lower cost.
Configuration Steps
- Open Cursor and press
Ctrl+Shift+J(orCmd+Shift+Jon Mac) to open Cursor Settings. - Navigate to Models → Model Providers and select OpenAI Compatible.
- Set Base URL to
https://api.anrouter.com/v1. - Paste your AnRouter API key into the API Key field.
- In the Models list, add the model IDs you want to use (see table below). Click Verify to confirm connectivity.
- Select your preferred model as the default for AI chat and inline completions.
Available Model IDs
| Model ID | Provider | Best For |
|---|---|---|
| deepseek-v4-flash | DeepSeek | Fast code completion, everyday tasks |
| glm-5.2 | Z.ai | Strongest coding, code reasoning, complex refactors |
| qwen-3.6-27b | Qwen | 27B multimodal input when image/video is needed |
| mimo-v2.5-pro | Xiaomi | Agentic software engineering, math reasoning |
| kimi-k2.6 | Moonshot AI | Vision, long context, UI/UX and repository analysis |
deepseek-v4-flash for speed. Switch to glm-5.2 for the Cursor Chat panel when working on complex code reasoning and multi-file refactors.
Windsurf Integration
Windsurf (by Codeium) is an agentic IDE with deep context awareness and multi-file editing capabilities. It supports custom OpenAI-compatible providers through its AI provider settings, allowing you to point it at AnRouter and use any of the supported frontier models.
Configuration Steps
- Open Windsurf and go to Settings (gear icon, bottom-left) → AI Settings → Providers.
- Click Add Custom Provider and choose OpenAI Compatible as the provider type.
- Set the API Base URL to
https://api.anrouter.com/v1. - Paste your AnRouter API key into the API Key field.
- In Default Model, enter the model ID you want to use (e.g.
deepseek-v4-flash). - Click Save and restart Windsurf. The Cascade AI panel will now route through AnRouter.
Environment Variable Alternative
You can also set API credentials via environment variables before launching Windsurf:
# Linux / macOS
export OPENAI_API_BASE=https://api.anrouter.com/v1
export OPENAI_API_KEY=your_anrouter_api_key
windsurf .
# Windows PowerShell
$env:OPENAI_API_BASE = "https://api.anrouter.com/v1"
$env:OPENAI_API_KEY = "your_anrouter_api_key"
windsurf .
kimi-k2.6 (256K context) or glm-5.2 for large-scale refactoring sessions.
Cline Integration
Cline (formerly Claude Dev) is a powerful autonomous coding agent extension for VS Code. It can plan, write, and execute multi-step code changes by itself. Cline natively supports OpenAI-compatible API providers, so you can easily route it through AnRouter to access DeepSeek, Kimi, and other frontier reasoning models through a single endpoint.
Configuration Steps
- Install the Cline extension from the VS Code Marketplace.
- Click the Cline icon in the Activity Bar to open the Cline panel.
- Click the Settings (gear) icon inside the Cline panel.
- Set API Provider to OpenAI Compatible.
- Set Base URL to
https://api.anrouter.com/v1. - Paste your AnRouter API key into the API Key field.
- In the Model field, enter your preferred model ID (e.g.
glm-5.2). - Click Save. Cline will immediately use AnRouter for all agentic coding tasks.
Recommended Models for Cline
| Model ID | Context | Recommendation |
|---|---|---|
| glm-5.2 | 1M | Best for complex code reasoning and multi-file agentic tasks |
| kimi-k2.6 | 256K | Best when whole-repo context is needed |
| deepseek-v4-flash | 1M | Budget-friendly for lighter tasks |
| qwen-3.6-27b | 256K | Use when the client supports image/video input |
Continue Integration
Continue is an open-source AI coding assistant extension for VS Code and JetBrains IDEs. It provides inline code suggestions, chat-based assistance, and slash commands. Continue supports OpenAI-compatible APIs via a JSON configuration file, making it straightforward to connect to AnRouter.
Step 1 — Install Continue
Install Continue from the VS Code Marketplace or JetBrains Plugin Marketplace. Once installed, it creates a config file at ~/.continue/config.json.
Step 2 — Edit config.json
Open ~/.continue/config.json and add AnRouter as a model provider. You can configure multiple models simultaneously:
{
  "models": [
    {
      "title": "DeepSeek V4 Flash (AnRouter)",
      "provider": "openai",
      "model": "deepseek-v4-flash",
      "apiBase": "https://api.anrouter.com/v1",
      "apiKey": "YOUR_ANROUTER_API_KEY"
    },
    {
      "title": "Kimi K2.6 (AnRouter)",
      "provider": "openai",
      "model": "kimi-k2.6",
      "apiBase": "https://api.anrouter.com/v1",
      "apiKey": "YOUR_ANROUTER_API_KEY"
    }
  ],
  "tabAutocompleteModel": {
    "title": "DeepSeek Flash (autocomplete)",
    "provider": "openai",
    "model": "deepseek-v4-flash",
    "apiBase": "https://api.anrouter.com/v1",
    "apiKey": "YOUR_ANROUTER_API_KEY"
  }
}
Step 3 — Reload & Select
After saving the config, reload VS Code. In the Continue panel (sidebar), use the model dropdown to switch between the models you configured. All chat and tab-autocomplete requests will route through AnRouter.
tabAutocompleteModel field configures the inline ghost-text autocomplete separately from the chat model. Use a fast model like deepseek-v4-flash here for low-latency suggestions while using a more capable model in the chat panel.
Aider Integration
Aider is an AI pair programming tool for the terminal. It can edit files in your local git repository, commit changes, and handle complex multi-file refactors via natural language. Aider supports any OpenAI-compatible API endpoint, so connecting it to AnRouter takes only two environment variables.
If Aider is Already Installed
Set the following environment variables, then run Aider as usual:
Linux / macOS
export OPENAI_API_BASE="https://api.anrouter.com/v1"
export OPENAI_API_KEY="your_anrouter_api_key"

aider --model openai/deepseek-v4-flash
Windows PowerShell
$env:OPENAI_API_BASE = "https://api.anrouter.com/v1"
$env:OPENAI_API_KEY = "your_anrouter_api_key"

aider --model openai/deepseek-v4-flash
Fresh Installation
- Install Aider:
pip install aider-chat - Set the environment variables above (or add them to your
~/.bashrc/~/.zshrc). - Navigate to your git repo and run:
aider --model openai/glm-5.2 path/to/file.py
Environment Variable Reference
| Variable | Value | Description |
|---|---|---|
| OPENAI_API_BASE | https://api.anrouter.com/v1 | AnRouter API endpoint |
| OPENAI_API_KEY | your_anrouter_api_key | Your AnRouter API key |
openai/ when using a custom API base (e.g. openai/deepseek-v4-flash). This tells Aider to use the OpenAI client library rather than a native provider integration.
GitHub Copilot Integration
GitHub Copilot supports custom OpenAI-compatible API endpoints through VS Code's advanced settings. By redirecting Copilot's API calls to AnRouter, you can power the Copilot Chat panel and inline suggestions with any of AnRouter's frontier models — a powerful cost-saving alternative to Copilot's default models.
VS Code Settings
Open VS Code Settings (JSON) via Ctrl+Shift+P → Open User Settings (JSON) and add the following block:
// settings.json
{
  "github.copilot.advanced": {
    "openaiApiKey": "your_anrouter_api_key",
    "openaiApiBaseUrl": "https://api.anrouter.com/v1"
  }
}
Selecting a Model in Copilot Chat
- Open the Copilot Chat panel in VS Code (
Ctrl+Shift+I). - Click the model selector dropdown at the top of the chat panel.
- Choose one of the AnRouter model IDs — they will appear in the list once the custom base URL is configured.
- Start chatting. All requests will route through AnRouter.
glm-5.2 for complex reasoning, deepseek-v4-flash for quick Q&A and code generation.
VS Code Integration
There are multiple ways to use AnRouter inside VS Code. The most flexible approach is via the Continue extension, which provides both inline ghost-text autocomplete and a full-featured chat panel, all configurable to point at any OpenAI-compatible endpoint.
Method 1: Continue Extension (Recommended)
- Install the Continue extension from the VS Code Marketplace.
- Open
~/.continue/config.json(Continue auto-creates this on first launch). - Add AnRouter as a model provider:
// ~/.continue/config.json
{
  "models": [
    {
      "title": "AnRouter - GLM 5.2",
      "provider": "openai",
      "model": "glm-5.2",
      "apiBase": "https://api.anrouter.com/v1",
      "apiKey": "your_anrouter_api_key"
    },
    {
      "title": "AnRouter - Kimi K2.6",
      "provider": "openai",
      "model": "kimi-k2.6",
      "apiBase": "https://api.anrouter.com/v1",
      "apiKey": "your_anrouter_api_key"
    }
  ],
  "tabAutocompleteModel": {
    "title": "AnRouter - DeepSeek Flash (autocomplete)",
    "provider": "openai",
    "model": "deepseek-v4-flash",
    "apiBase": "https://api.anrouter.com/v1",
    "apiKey": "your_anrouter_api_key"
  }
}
Method 2: Cline Extension
For agentic multi-file editing, install Cline from the Marketplace instead. In the Cline settings panel, set the API provider to OpenAI Compatible, enter https://api.anrouter.com/v1 as the Base URL, and paste your AnRouter key. See the Cline Integration section for full details.
Method 3: GitHub Copilot Chat Override
If you have a GitHub Copilot subscription, you can redirect the Copilot Chat panel to AnRouter via github.copilot.advanced in your VS Code settings. See the GitHub Copilot Integration section for instructions.
LangChain Integration
LangChain is the most widely-used framework for building LLM-powered applications. AnRouter works as a drop-in replacement for the OpenAI API within LangChain — simply pass the AnRouter base URL and API key when instantiating ChatOpenAI. All LangChain features — chains, agents, RAG pipelines, memory, structured output — work without any other modifications.
Installation
pip install langchain langchain-openai
Basic Chat Completion
from langchain_openai import ChatOpenAI

llm = ChatOpenAI(
    model="deepseek-v4-flash",
    openai_api_key="your_anrouter_api_key",
    openai_api_base="https://api.anrouter.com/v1"
)

response = llm.invoke("Explain the difference between LangChain chains and agents.")
print(response.content)
Using with a Chain
from langchain_openai import ChatOpenAI
from langchain_core.prompts import ChatPromptTemplate
from langchain_core.output_parsers import StrOutputParser

llm = ChatOpenAI(
    model="glm-5.2",
    openai_api_key="your_anrouter_api_key",
    openai_api_base="https://api.anrouter.com/v1"
)

prompt = ChatPromptTemplate.from_template("Summarize this in one sentence: {text}")
chain = prompt | llm | StrOutputParser()

result = chain.invoke({"text": "LangChain is a framework for building LLM applications."})
print(result)
Using with an Agent
from langchain_openai import ChatOpenAI
from langchain.agents import create_tool_calling_agent, AgentExecutor
from langchain_core.prompts import ChatPromptTemplate
from langchain_community.tools import DuckDuckGoSearchRun

llm = ChatOpenAI(
    model="glm-5.2",
    openai_api_key="your_anrouter_api_key",
    openai_api_base="https://api.anrouter.com/v1"
)
tools = [DuckDuckGoSearchRun()]
prompt = ChatPromptTemplate.from_messages([
    ("system", "You are a helpful assistant."),
    ("human", "{input}"),
    ("placeholder", "{agent_scratchpad}"),
])
agent = create_tool_calling_agent(llm, tools, prompt)
executor = AgentExecutor(agent=agent, tools=tools, verbose=True)
executor.invoke({"input": "What is the latest news about DeepSeek?"})
OPENAI_API_KEY and OPENAI_API_BASE as environment variables instead of passing them directly to ChatOpenAI. LangChain will read them automatically.
LlamaIndex Integration
LlamaIndex is a leading data framework for building RAG (Retrieval-Augmented Generation) and agentic AI applications. By using the OpenAI-compatible LLM class with a custom api_base, you can route all LlamaIndex queries through AnRouter. All LlamaIndex features — VectorStoreIndex, query engines, agents, chat engines — work without modification.
Installation
pip install llama-index llama-index-llms-openai
Configure the LLM
from llama_index.llms.openai import OpenAI
from llama_index.core import Settings

llm = OpenAI(
    model="kimi-k2.6",
    api_key="your_anrouter_api_key",
    api_base="https://api.anrouter.com/v1"
)

# Set as the global default so all LlamaIndex operations use it
Settings.llm = llm
RAG Example — Index & Query Documents
from llama_index.llms.openai import OpenAI
from llama_index.embeddings.openai import OpenAIEmbedding
from llama_index.core import VectorStoreIndex, SimpleDirectoryReader, Settings

Settings.llm = OpenAI(
    model="glm-5.2",
    api_key="your_anrouter_api_key",
    api_base="https://api.anrouter.com/v1"
)
Settings.embed_model = OpenAIEmbedding(
    api_key="your_anrouter_api_key",
    api_base="https://api.anrouter.com/v1"
)

# Load documents and build index
documents = SimpleDirectoryReader("./docs").load_data()
index = VectorStoreIndex.from_documents(documents)

# Query
query_engine = index.as_query_engine()
response = query_engine.query("What is the main topic of these documents?")
print(response)
kimi-k2.6 (256K context) to avoid context overflow. Use deepseek-v4-flash for embedding-light tasks where speed matters more than context size.
CrewAI Integration
CrewAI is a popular multi-agent orchestration framework for building collaborative AI systems. Agents are organized into "crews" with distinct roles, goals, and backstories. CrewAI supports any OpenAI-compatible LLM via its LLM class, so you can direct all agent reasoning through AnRouter without changing any agent logic.
Installation
pip install crewai crewai-tools
Configure AnRouter as the LLM Backend
from crewai import LLM, Agent, Task, Crew

# Create an LLM instance pointing to AnRouter
llm = LLM(
    model="openai/glm-5.2",  # prefix with "openai/" for OpenAI-compatible providers
    base_url="https://api.anrouter.com/v1",
    api_key="your_anrouter_api_key"
)

# Define agents with the AnRouter LLM
researcher = Agent(
    role="Senior Research Analyst",
    goal="Uncover cutting-edge developments in AI",
    backstory="You work at a leading tech think tank.",
    llm=llm,
    verbose=True
)

writer = Agent(
    role="Tech Content Strategist",
    goal="Craft compelling content on tech advancements",
    backstory="You are a renowned content strategist known for insightful articles.",
    llm=llm,
    verbose=True
)

# Define tasks
research_task = Task(
    description="Analyze the latest frontier AI model releases and identify key trends.",
    expected_output="A bullet-point summary of 5 key AI trends.",
    agent=researcher
)

write_task = Task(
    description="Write a short blog post based on the research findings.",
    expected_output="A 3-paragraph blog post about AI trends.",
    agent=writer
)

# Assemble and run the crew
crew = Crew(agents=[researcher, writer], tasks=[research_task, write_task], verbose=True)
result = crew.kickoff()
print(result)
openai/ (e.g. openai/glm-5.2) when using CrewAI's LLM class with a custom base URL. This signals to CrewAI's litellm backend to use the OpenAI-compatible client.
AutoGen / AG2 Integration
AutoGen (now AG2) is Microsoft's framework for building multi-agent AI systems with conversational patterns. AutoGen agents communicate with each other to solve tasks, and the framework supports custom OpenAI-compatible endpoints via a config list. All agent types — AssistantAgent, UserProxyAgent, GroupChat — work without any code changes.
Installation
pip install pyautogen
Two-Agent Conversation Example
import autogen

# Configure AnRouter as the LLM backend
config_list = [{
    "model": "glm-5.2",
    "api_key": "your_anrouter_api_key",
    "base_url": "https://api.anrouter.com/v1",
    "api_type": "openai"
}]

llm_config = {
    "config_list": config_list,
    "temperature": 0.7,
    "timeout": 120
}

# Create agents
assistant = autogen.AssistantAgent(
    name="assistant",
    llm_config=llm_config,
    system_message="You are a helpful AI assistant."
)

user_proxy = autogen.UserProxyAgent(
    name="user_proxy",
    human_input_mode="NEVER",   # fully automated
    max_consecutive_auto_reply=3,
    code_execution_config={"work_dir": "coding", "use_docker": False}
)

# Start conversation
user_proxy.initiate_chat(
    assistant,
    message="Write a Python function that calculates the nth Fibonacci number."
)
GroupChat with Multiple Agents
# Multiple specialized agents in a group chat
coder = autogen.AssistantAgent(name="Coder", llm_config=llm_config,
    system_message="You write clean, well-documented Python code.")
reviewer = autogen.AssistantAgent(name="Reviewer", llm_config=llm_config,
    system_message="You review code for bugs and suggest improvements.")

groupchat = autogen.GroupChat(agents=[user_proxy, coder, reviewer], messages=[], max_round=6)
manager = autogen.GroupChatManager(groupchat=groupchat, llm_config=llm_config)
user_proxy.initiate_chat(manager, message="Build and review a binary search function.")
human_input_mode="NEVER" on UserProxyAgent for fully automated pipelines. Use human_input_mode="TERMINATE" to allow human review before each auto-reply.
OpenAI Agents SDK Integration
The OpenAI Agents SDK (formerly known as Swarm) is OpenAI's official framework for building agentic AI applications. It supports custom API clients, meaning you can point it at AnRouter with a single client override and use any of AnRouter's models across all agents, runners, and handoff flows.
Installation
pip install openai-agents
Basic Agent Example
from agents import Agent, Runner, set_default_client
from openai import AsyncOpenAI

# Point the SDK at AnRouter
client = AsyncOpenAI(
    base_url="https://api.anrouter.com/v1",
    api_key="your_anrouter_api_key"
)
set_default_client(client)

# Define an agent
agent = Agent(
    name="Assistant",
    model="glm-5.2",
    instructions="You are a helpful assistant. Be concise and accurate."
)

# Run synchronously
result = Runner.run_sync(agent, "Summarize the key advantages of transformer architectures.")
print(result.final_output)
Multi-Agent Handoff Example
from agents import Agent, Runner, handoff, set_default_client
from openai import AsyncOpenAI
import asyncio

set_default_client(AsyncOpenAI(
    base_url="https://api.anrouter.com/v1",
    api_key="your_anrouter_api_key"
))

code_agent = Agent(
    name="CodeAgent",
    model="glm-5.2",
    instructions="You write production-quality Python code."
)

triage_agent = Agent(
    name="TriageAgent",
    model="deepseek-v4-flash",
    instructions="Route coding questions to CodeAgent, answer general questions yourself.",
    handoffs=[handoff(code_agent)]
)

async def main():
    result = await Runner.run(triage_agent, "Write a function to reverse a linked list.")
    print(result.final_output)

asyncio.run(main())
deepseek-v4-flash for triage agents (low cost, high throughput), glm-5.2 for specialist agents that need strong code reasoning, and qwen-3.6-27b when the agent needs multimodal input.
n8n Integration
n8n is a powerful open-source workflow automation platform with 500+ integrations. Its built-in AI nodes support OpenAI-compatible APIs, so you can use AnRouter's frontier models in any n8n AI workflow — chatbots, document extraction, summarization pipelines, and more — without writing any code.
Option 1: OpenAI Node with Custom Base URL
- In your n8n workflow canvas, click + Add Node and search for OpenAI.
- In the node's Credentials section, click Create New Credential.
- Set API Key to your AnRouter API key.
- Set Base URL to
https://api.anrouter.com/v1. - In the node settings, set Resource to Chat and Model to your preferred model ID (e.g.
deepseek-v4-flash). - Connect input and output nodes as needed. Click Execute Node to test.
Option 2: HTTP Request Node (Direct API)
For maximum flexibility, use an HTTP Request node to call AnRouter directly:
Method: POST
URL: https://api.anrouter.com/v1/chat/completions
Headers:
  Authorization: Bearer your_anrouter_api_key
  Content-Type: application/json
Body (JSON):
{
  "model": "deepseek-v4-flash",
  "messages": [
    {"role": "system", "content": "You are a helpful assistant."},
    {"role": "user", "content": "{{ $json.userMessage }}"}
  ]
}
Using n8n's AI Agent Node
n8n's AI Agent node supports custom OpenAI-compatible chat models. Add an OpenAI Chat Model sub-node, configure it with the AnRouter credentials above, and connect it to the AI Agent. This gives the agent access to n8n's full tool ecosystem — web search, spreadsheets, databases, and more.
Dify Integration
Dify is a popular open-source LLM application development platform that supports chatbots, agents, RAG pipelines, and workflow automation. Dify has first-class support for OpenAI-compatible model providers. Once you add AnRouter as a model provider in Dify's settings, all Dify apps, chatflows, and agents can select AnRouter models from the model picker.
Adding AnRouter as a Model Provider
- Log in to your Dify instance and click your avatar → Settings.
- Go to Model Provider → scroll to OpenAI-Compatible and click Add Model.
- Fill in the form:
Model Name:    deepseek-v4-flash       (or any model ID you want to add)
Model Type:    LLM
API Key:       your_anrouter_api_key
API Base URL:  https://api.anrouter.com/v1
Model Context: 128000                  (tokens)
Vision:        Off                     (unless using a vision model)
- Click Save. Repeat steps 2–4 for each model you want to add (e.g.
glm-5.2,qwen-3.6-27b,kimi-k2.6). - When creating or editing a Dify App, select your AnRouter model from the Model dropdown in the app configuration panel.
Self-Hosted Dify (Docker)
If you're running self-hosted Dify, you can also set the default model provider via environment variables in your docker-compose.yaml:
# In your Dify docker-compose.yaml, under the api service environment:
OPENAI_API_BASE: https://api.anrouter.com/v1
OPENAI_API_KEY: your_anrouter_api_key
deepseek-v4-flash as the default for fast chatflows and kimi-k2.6 for knowledge-base RAG apps where large document contexts are needed.
Flowise Integration
Flowise is an open-source drag-and-drop UI for building LLM flows and chatbots using LangChain. It lets you visually assemble RAG pipelines, agents, and conversational UIs without writing code. Flowise includes a ChatOpenAI node that accepts a custom base URL, making it straightforward to connect to AnRouter.
Installation (Self-Hosted)
npm install -g flowise
npx flowise start  # opens UI at http://localhost:3000
Connecting AnRouter via ChatOpenAI Node
- Open Flowise at
http://localhost:3000and create a new Chatflow. - From the node panel (left sidebar), search for ChatOpenAI and drag it onto the canvas.
- Click the ChatOpenAI node to open its settings.
- In the Credentials section, click Create New and enter your AnRouter API key.
- Set Model Name to your preferred model (e.g.
deepseek-v4-flash). - In Additional Parameters, set BasePath to
https://api.anrouter.com/v1. - Connect the ChatOpenAI node to other nodes (e.g. a Conversational Retrieval QA Chain for RAG) and save the flow.
ChatOpenAI Node Configuration:
  Model Name:  glm-5.2
  OpenAI Api Key: your_anrouter_api_key
  BasePath: https://api.anrouter.com/v1
  Temperature: 0.7
  Max Tokens: 4096
Using in a RAG Pipeline
For document Q&A, connect the ChatOpenAI node to a Conversational Retrieval QA Chain node, then add a Vector Store node (e.g. Chroma or Pinecone) as the retriever. Flowise handles the full RAG orchestration — you only need to configure the LLM node to point at AnRouter.
/v1 suffix: https://api.anrouter.com/v1. Unlike the Anthropic SDK, Flowise does not append the path suffix automatically.
OpenRouter Integration
AnRouter provides an OpenAI-compatible API surface that is functionally equivalent to OpenRouter, but focused on China's frontier models — DeepSeek, Kimi, GLM, MiMo, and MiniMax. If you already have code or tooling configured for OpenRouter, you can migrate to AnRouter by simply swapping the base URL. No other code changes are required.
Migrating from OpenRouter
# Before (OpenRouter)
client = openai.OpenAI(
    base_url="https://openrouter.ai/api/v1",
    api_key="your_openrouter_key"
)

# After (AnRouter) — only the base_url and api_key change
client = openai.OpenAI(
    base_url="https://api.anrouter.com/v1",
    api_key="your_anrouter_api_key"
)
Direct REST API
AnRouter's API is a drop-in replacement for any OpenRouter REST call:
Linux / macOS
curl https://api.anrouter.com/v1/chat/completions   -H "Authorization: Bearer $ANROUTER_API_KEY"   -H "Content-Type: application/json"   -d '{
    "model": "deepseek-v4-flash",
    "messages": [{"role": "user", "content": "Hello, who are you?"}]
  }'
Windows PowerShell
$headers = @{"Authorization" = "Bearer $env:ANROUTER_API_KEY"; "Content-Type" = "application/json"}
$body = '{"model":"deepseek-v4-flash","messages":[{"role":"user","content":"Hello!"}]}'
Invoke-RestMethod -Uri "https://api.anrouter.com/v1/chat/completions" -Method Post -Headers $headers -Body $body
Why AnRouter over OpenRouter?
| Feature | AnRouter | OpenRouter |
|---|---|---|
| Chinese AI Models | Full coverage | Partial |
| API Compatibility | OpenAI + Anthropic | OpenAI only |
| Pricing | Up to 60% lower | Standard |
| Region Focus | China AI ecosystem | Global |
Ollama Integration
Ollama is designed for running open-source LLMs locally on your machine. However, many tools and scripts that were written to use Ollama (via its OpenAI-compatible API) can be easily redirected to AnRouter for cloud-backed inference with frontier models — no local GPU required. This is useful when you want to switch between local and cloud inference without changing application code.
Redirecting Ollama-Compatible Code to AnRouter
If you have scripts using Ollama's OpenAI-compatible endpoint (http://localhost:11434/v1), switch to AnRouter by changing the base URL:
from openai import OpenAI

# Before (Ollama local)
# client = OpenAI(base_url="http://localhost:11434/v1", api_key="ollama")

# After (AnRouter cloud — same code structure)
client = OpenAI(
    base_url="https://api.anrouter.com/v1",
    api_key="your_anrouter_api_key"
)

response = client.chat.completions.create(
    model="deepseek-v4-flash",   # use AnRouter model IDs
    messages=[{"role": "user", "content": "What is the capital of France?"}]
)
print(response.choices[0].message.content)
Using Ollama + AnRouter Together
You can use LiteLLM as a gateway to route some requests to local Ollama and others to AnRouter, based on model name:
import litellm

# Route to local Ollama (small model, offline tasks)
response_local = litellm.completion(
    model="ollama/llama3",
    messages=[{"role": "user", "content": "Quick local task."}]
)

# Route to AnRouter (frontier model, complex reasoning)
response_cloud = litellm.completion(
    model="openai/glm-5.2",
    api_base="https://api.anrouter.com/v1",
    api_key="your_anrouter_api_key",
    messages=[{"role": "user", "content": "Complex analysis task."}]
)
LiteLLM Integration
LiteLLM is a unified Python SDK and proxy that normalizes the API interface for 100+ LLM providers. AnRouter integrates via the openai/ provider prefix with a custom api_base. Once configured, all LiteLLM features — automatic retries, fallbacks, load balancing, cost tracking, and logging — work seamlessly with AnRouter.
Installation
pip install litellm
Basic Completion
import litellm

response = litellm.completion(
    model="openai/deepseek-v4-flash",   # prefix with "openai/" for custom endpoints
    api_base="https://api.anrouter.com/v1",
    api_key="your_anrouter_api_key",
    messages=[{"role": "user", "content": "Explain gradient descent in simple terms."}]
)
print(response.choices[0].message.content)
Fallback Routing
LiteLLM's fallback feature can automatically route to a different AnRouter model if the primary model is unavailable:
import litellm

# Define fallback order
response = litellm.completion(
    model="openai/glm-5.2",
    api_base="https://api.anrouter.com/v1",
    api_key="your_anrouter_api_key",
    messages=[{"role": "user", "content": "Your prompt here."}],
    fallbacks=[
        {"model": "openai/deepseek-v4-flash", "api_base": "https://api.anrouter.com/v1", "api_key": "your_anrouter_api_key"},
        {"model": "openai/kimi-k2.6", "api_base": "https://api.anrouter.com/v1", "api_key": "your_anrouter_api_key"}
    ]
)
LiteLLM Proxy Server
Run LiteLLM as a local proxy with AnRouter as the backend. This lets all your applications target http://localhost:8000 without any per-app configuration:
# config.yaml
model_list:
  - model_name: deepseek-v4-flash
    litellm_params:
      model: openai/deepseek-v4-flash
      api_base: https://api.anrouter.com/v1
      api_key: your_anrouter_api_key
  - model_name: glm-5.2
    litellm_params:
      model: openai/glm-5.2
      api_base: https://api.anrouter.com/v1
      api_key: your_anrouter_api_key

# Start the proxy
litellm --config config.yaml --port 8000
Once the proxy is running, any OpenAI-compatible client can use it by pointing at http://localhost:8000 with any API key (the proxy handles authentication to AnRouter).
http://your-litellm-server:8000 without each needing their own AnRouter key.